CrewCom includes CrewWare, companion desktop software, to simplify the process of optimizing your CrewCom wireless system. CrewWare is used for monitoring and managing CrewCom wireless intercom systems. The software enables the user to create a CrewCom Configuration File (CCF) offline and then load the settings to your system from a portable USB drive or from a connected computer. CrewWare provides an intuitive method of accessing all connected CrewCom devices and their associated peripherals. CrewWare allows a user to adjust critical settings from the computer, and only requires connection to your existing computer or computer network.
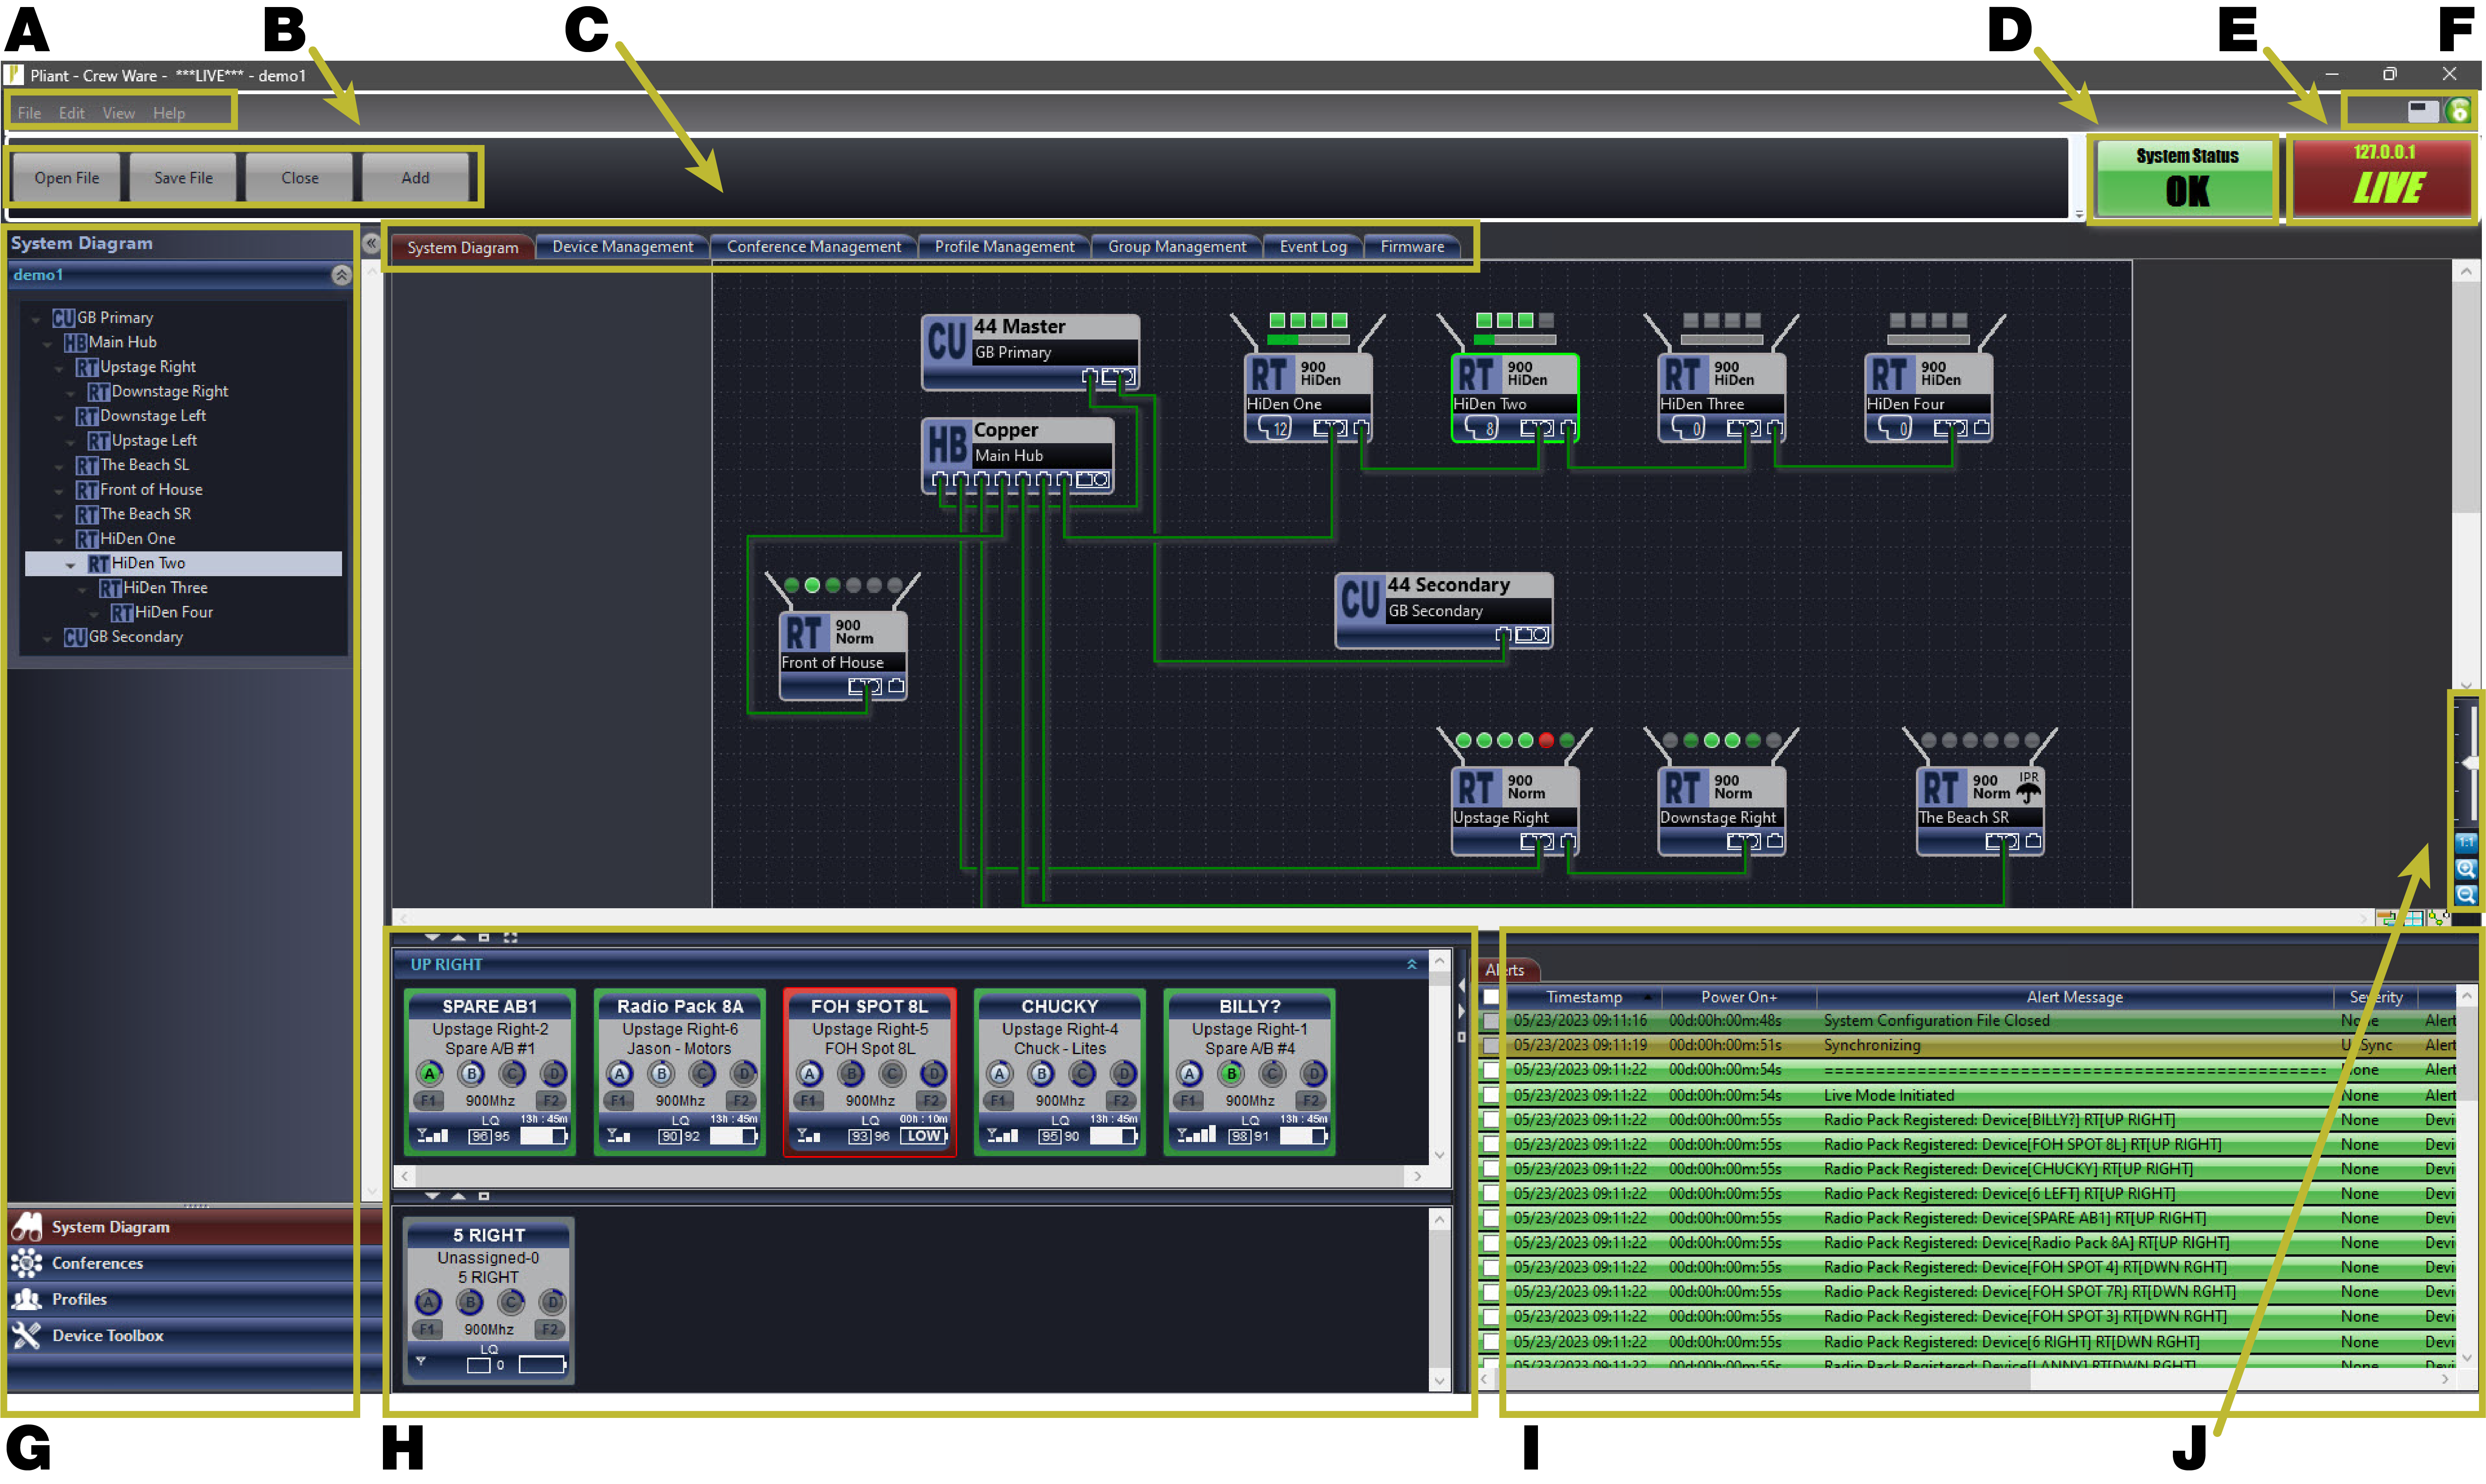
CrewWare functions from a set of one-click navigation panes and tabs. The menu bars located on the top of the screen and the System status and Connection status indicators in the upper right corner are static and remain available while CrewWare is open. The large display in the center of the CrewWare screen and the navigation panes on the left-hand side vary depending on which tab is selected by the user. The image below provides an overview of the basic menus and indicators found throughout CrewWare.
| CrewWare Overview | |||||||||||||||||
|---|---|---|---|---|---|---|---|---|---|---|---|---|---|---|---|---|---|
|
Label |
Field/Function |
Description |
|||||||||||||||
|
A |
Menu Bar |
Located in the top left corner of the screen, and contains command options typically found in most software packages: File, Edit, View, and Help. |
|||||||||||||||
|
B |
Command Buttons |
Located directly under the menu bar, and provide one-click shortcuts to four CrewWare functions: Open File, Save File, Close, and Add. The Add button is used to add devices to the System Diagram. |
|||||||||||||||
|
C |
Tabs |
Located just above the primary viewing area, tabs allow users to easily navigate between the various operational views: |
|||||||||||||||
|
D |
System Status Indicator |
Located in the top right corner of the screen, and will display a system status message. See the possible statuses listed below. The system status is determined by the highest severity level of any active alerts in the system’s Event Log.
|
|||||||||||||||
|
E |
Connection Status (Toggle) |
Located in the top right corner of the screen, and indicates the current status of the CrewWare connection to CrewCom hardware: Offline or Live. When Live, the connected CU’s IP address is displayed at the top of the button, and all updates from the software are reflected in real-time in the hardware. Click this button to toggle the connection between the two options. See Connect to CrewWare for more information. Note: CrewWare does not allow users to make system configuration or LAN settings changes while system is in “Live” mode. |
|||||||||||||||
|
F |
Sync In Indicator, Mini View Toggle, and CrewWare Access Rights Lock |
The Sync In Indicator appears in CrewWare when a CrewNet signal is connected to the Sync In port of the Primary CU. The “Mini View” Toggle is a rectangular button located in the top right corner of the screen, and it expands or collapses the CrewWare window. The Padlock icon is located in the top right corner of the screen, and it indicates the current system access level. While the system is secured, the icon will display as a red, locked padlock, and the access rights are considered “user level” and are therefore view-only access. While the system is open, the icon will display as a green, unlocked padlock, and the access rights are considered “administrator level” and are therefore open for all changes. Unlocking the access requires entry of a specific access code, which is set from the Edit menu. |
|||||||||||||||
|
G |
Navigation Pane |
Located on the left side of the screen, and expands to display sub-lists within each panel: System Diagram, Conferences, Profiles, and Device Toolbox. Pane can be collapsed if the user wishes to hide it. The display name used atop the system diagram list determines the configuration name stored on the associated primary Control Unit when in “live” mode. This display name can be altered by opening the Diagram Preferences window (click Edit > Diagram Preferences.) |
|||||||||||||||
|
H |
Real-Time Pack View |
Located in the bottom left corner of the screen, and displays a real-time view of each Radio Pack (RP) in operation. The top portion of the window (or "Active panel") displays RPs in operation with “Live” connection status. The bottom portion of the window (or "Inactive panel") displays RPs that are paired to the system, but not yet logged in. Double-click on an individual RP icon to access its Device Management detail view. Right-click on an individual RP in order to modify the list display or to enable the Mic Kill option or unpair the RP. RPs only appear in this view when logged into the system (and CrewWare is online). This view can be resized, expanded, or hidden. See Real-Time Pack View for more information. |
|||||||||||||||
|
I |
Event Log Table |
Located directly opposite of the Real-Time Pack View in the bottom right corner of the screen. The Alerts sub-tab repeats the same categories of data available in the Event Log: Timestamp, Power On, Severity, Type, Alert Status, Target, Device ID, Layer, Alert Message, and CCF Name. This view can be resized, expanded, or hidden. See Event Log Tab for more information. |
|||||||||||||||
|
J |
System Diagram View Shortcuts |
Located on the right side of the screen, and toggle between three separate screen views for the System Diagram tab: Diagram View, Port View, and Relays View. These shortcuts are only applicable when viewing the System Diagram tab. See System Diagram for more information on these views. |
|||||||||||||||