CrewCom's LAN TCP/IP configuration can be either Manual or via Dynamic Host Configuration Protocol (DHCP).
To use DHCP, the CrewCom Control Unit will need to be configured as a DHCP client. If DHCP is not enabled on your LAN, then the CrewCom system can be configured to use static IP Addresses. After the CrewCom system is fully booted-up, and the Control Unit is assigned an IP Address (either through DHCP or manually), CrewWare can connect to the Control Unit. The procedures for this entire configuration are detailed in the following sections.
LAN Configuration Procedures
Note: If the CU is powering on for the first time or if it has been reset to factory defaults, the LAN Configuration option is found under Load Configuration > Load Configuration via LAN. Otherwise, follow the steps below.
- Set the IP Address: To get started configuring your system’s LAN connection, determine if you will use DHCP or manually set your system IP Address:
- For DHCP Configuration: When the CU is booted, it automatically receives an IP Address from the DHCP server.
The CU does not automatically receive an IP Address if it powering on for the first time or if it has been reset to factory defaults. DHCP must be chosen during setup for TCP/IP Mode.
- Press the CU’s menu button on the bottom right of the LCD to access the menu, then use the CU’s navigation buttons to access the LAN Settings option.
- Take note of the TCP/IP address for the CU, then skip to Step 3.
Note: For non-factory-configured systems, the default TCP/IP Mode for Control Units is DHCP Client.
Rendering of CU Menu Button
- For Manual IP Address Configuration: Enter the IP Address for the connected Control Unit via the CU LCD or via CrewWare.
- From the CU LCD:
- Press the Menu button on the front of the CU to access the menu.
- Scroll to select LAN Settings.
- From this menu, edit the TCP/IP Mode to be Manual; then, enter the TCP/IP Address, Subnet Mask, and Default Gateway. You can also view the current setting for MAC Address.
- Skip to Step 2.
- From CrewWare:
- Open the Control Unit detail view from the Device Management tab or by double-clicking the Control Unit from the System Diagram.
- If needed, edit the LAN Settings (IPv4) Settings panel to set the CU’s IP Address, Subnet Mask, Default Gateway, and Control Unit Port. (See Top Section of CU Detail View on CU Management Tab.) You may only make changes to these settings while CrewWare is offline. If no edits are needed, take note of the current LAN Settings (IPv4) Settings and skip to Step 2.
Note: If you edit the CU default LAN Settings (IPv4) settings, you will need to save your CrewCom Configuration File (CCF) and re-upload it to the CU for the changes to take effect.
- From the CU LCD:
- For DHCP Configuration: When the CU is booted, it automatically receives an IP Address from the DHCP server.
The CU does not automatically receive an IP Address if it powering on for the first time or if it has been reset to factory defaults. DHCP must be chosen during setup for TCP/IP Mode.
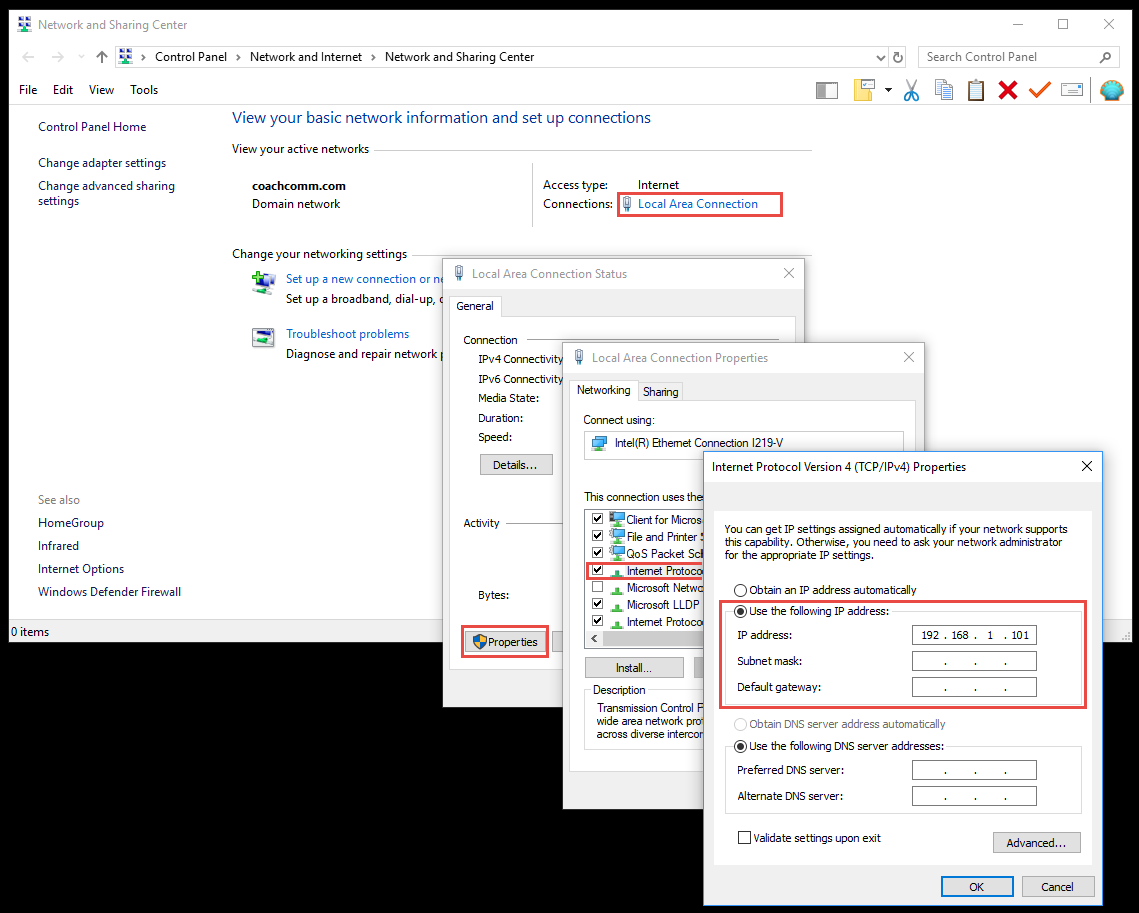
- Set your computer’s LAN Settings (IPv4) Manual IP Address.
Note: The steps below are specific to the Windows 10 operating system. Your settings and menus may differ slightly.
- Right-click your PC’s connection icon and select Open Network and Sharing Center. (Or access the same window from your PC’s Control Panel.)
- Open the Local Area Connection status information.
- Click Properties. A Local Area Connection Properties window will display.
- Double-click the Internal Protocol Version 4 (TCP/IPv4) option from the list of connection properties. A TCP/IPv4 Properties window will display.
- Select Use the following IP address and fill out the appropriate information, making sure that the first three sets of numbers are the same as your CU but that the last number is different. (See Example IP Address Settings Changes below.)
- Click OK.
- Establish the LAN Connection between CU and CrewWare.
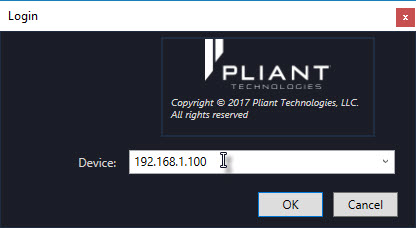
- Once the CU IP Address is assigned/set and your computer’s Manual IP Address is set (if needed), click the Offline button in CrewWare. The Login dialog will display. (See LAN Login Dialog Box below.)
- In the Device field, type the CU’s IP Address or select a previously entered IP Address.
Tip: If you need to reference a specific port number after the IP Address, add a colon (“:”) and add it at the end of the IP Address. The default Port value to connect to a Control Unit is 2017. You may change this default using CrewWare if your firewall settings require it.
- Click OK. Once a connection is established between CrewWare and the CU, the current configuration will display in the System Diagram tab and the connection status button will display “Live.”