About Profiles
A Radio Pack (RP) Profile assigns functionality to an RP’s local controls, knobs, and buttons (including Conference assignments), and allows customization for user preferences, roaming, and operational mode. RP Profiles are part of the CrewCom Configuration File (CCF) and contain two types of settings: Global or User. Refer to the table below for a complete list of these settings.
- Global Profile Settings – These settings are part of the CrewCom Configuration File and are usually assigned by a system administrator through CrewWare during setup. Find a full list of the global profile settings available for each Radio Pack in the table below.
- User Settings– A user setting is one that is classified as being adjustable by the Radio Pack user and is limited to local device settings that do not alter the CrewCom Configuration File. The Profile can be used to determine these settings, but they can also be customized directly from a Radio Pack after a Profile is loaded.
| Profile Management - Global Profile Settings | |
|---|---|
| Global Profile Settings | Description |
|
Profile Name |
Name assigned to the Profile |
|
Radio Transceiver Assignments (or Scan List) |
List of available Radio Transceivers each Radio Pack can log into and function with |
|
Conference Assignments |
Which Conferences are assigned to Volume knobs and corresponding Talk buttons |
|
ISO |
Enables selection of specific Profiles to be included in a Conference ISO. This function is either Enabled or Disabled. (ISO must also be enabled for the Conference.) |
|
Function Buttons |
Functions such as Stage Announce, Call, or Relays are assigned to the Pack’s F1 or F2 button Note: Relays can only be assigned from the |
|
Button Mode |
Determines the talk button behavior as either “Disabled,” “Momentary,” “Latch,” or “Always On.” |
|
Operational Mode |
Set to Normal by default. High Density is only available for systems upgraded to Version 1.10 or higher. |
| Profile Group | Enables selection of specific Profiles to include in a Profile Group, so that Profiles in a Group can be organized together in CrewWare’s Real-Time Pack Display for efficient visual monitoring. |
| Profile Management - User Settings | |
|---|---|
| User Settings | Description |
Sidetone | Level adjustment that determines the amount of your own voice that you will hear in your headset. |
Mic Gain | Adjusts the amount of microphone input gain into the Radio Pack. |
Noise Gate | Adjusts the Noise Gate threshold on the input of the Radio Pack. |
Volume Limit | Determines the minimum and maximum headset volume settings for the user. |
Talk Tones | Enables or Disables a set of tones (single tone for talk press and double tone for talk release) when the talk button is pressed. |
Profile Management List View
The Profile Management List View displays the CrewWare Profiles available to any Radio Packs currently connected to the CrewCom system.
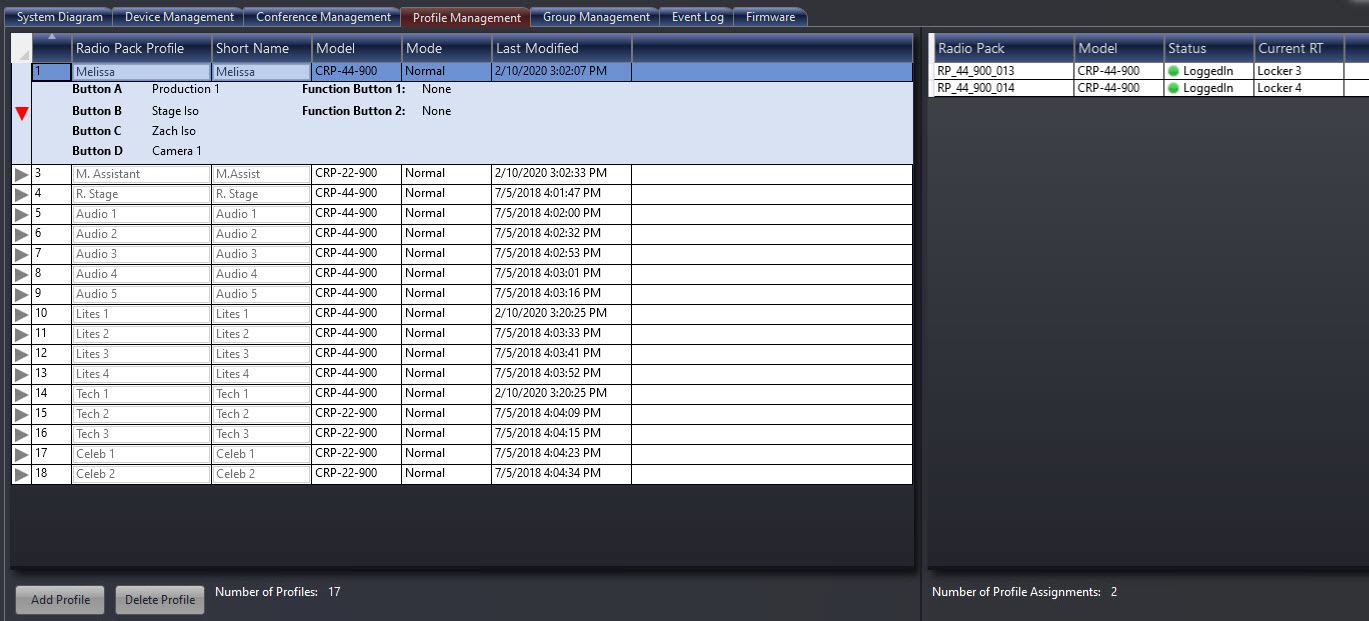
- Click on an individual entry from the Profile table to view a list of all assigned Radio Packs in a separate table to the right of the screen.
- Use the buttons along the bottom of the Profile Management tab window to add a new Profile or delete an existing Profile.
- Once a Profile is added to the list, double-click the new Profile to access its detail view and further customize its settings. (See the next section for more information.)
- To assign a new or different Profile to an RP, change the RP’s Assigned Profile from Device Management tab. (See RP Management Tab for more information.)
Profile Management Detail View
Double-click on a Profile in the list to access its detail view and view/edit its settings. In this view, clicking each sub-heading expands or collapses the panels containing more information and configurable settings. The top section of the detail view provides an overview of the selected Profile, including buttons to interact with other CrewWare functions, and a timestamp of the last modification.
Making edits to a Profile updates those settings for all Radio Packs using that Profile.

|
Profile Management - Detail View |
|
|
Field/Function |
Description |
|
Profile Name |
Type a name for the selected Profile. There is a 16 character limit on the Profile name. |
|
Short Name |
Type an abbreviated version of the Profile name to display when needed. There is an 8 character limit on the Profile short name. |
|
List View Button |
Return to the Profile Management list view. |
|
Expand/Collapse All Button |
Opens all collapsed settings panels for the selected profile. When clicked again, returns to collapsed panels |
|
Clone Profile |
Duplicate the selected Profile. The clone does not duplicate the profile name, using a default “RPProfile” instead. |
|
Upload Changes |
Upload the Profile settings to all assigned RPs. |
Note: RPs are only viewable and accessible when CrewWare is in a “Live” state with the system or if a system configuration has been saved while in “Live” mode after RPs have been paired.
Global Profile Settings
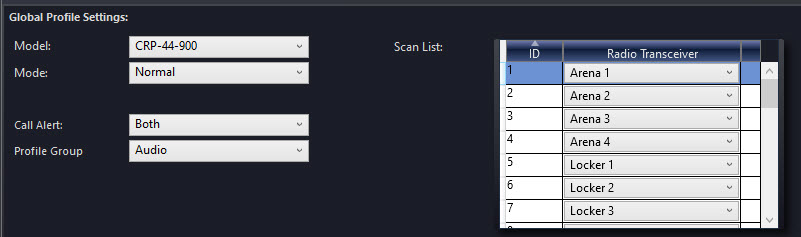
Adjust the following global settings from this panel:
|
Global Profile Settings |
|
|
Field/Function |
Description |
|
Model |
Select a Radio Pack model from the available options in the drop-down list. Profiles are model-specific. For example, a CRP-44 will not have access to a profile created for a CRP-22. In addition, profiles are frequency-specific. Therefore, a CRP-44-900 will not have access to a profile created for a CRP-44-2400. |
|
Operational Mode |
Set to Normal by default. High Density is only available for systems upgraded to Version 1.10 or higher. |
|
Call Alert |
Set to Off, Audible, Vibrate, or Both. (Vibrate and Both options are not available on the CRP-12.) |
| Profile Group | Enables selection of specific Profiles to include in a Profile Group, so that Profiles in a Group can be organized together in CrewWare’s Real-Time Pack Display for efficient visual monitoring. |
|
Scan List |
Use the scan list to set up specific coverage areas for RPs or allow RPs to access any RT. Profiles can be used to determine users’ access to certain areas through allowing or restricting them from logging in to certain RTs. Since this determination is profile-based, RT access can be quickly updated for users if necessary. |
For more information about managing user coverage and the CrewCom scan list, see Managing User Coverage .
Talk/Volume/ISO Controls
Buttons A, B, C, and D represent the (up to) four Volume Knobs and Talk Buttons available on each Radio Pack. The number of available Button setting panels will vary depending on the selected Radio Pack model. The CRP-44 has four Volume knobs and four Talk buttons, the CRP-22 has two of each, and the CRP-12 has one Talk button.

|
Profile Talk/Volume/ISO Controls |
|
|
Field/Function |
Description |
|
Conference |
Select a Conference assignment from the available options in the drop-down list. |
|
Button Mode |
Select either Latch,Momentary, Disable, or Always On from the drop-down list. Note: Always On is not an option in High Density mode. |
|
Call on Talk |
Toggle the Call on Talk function for the profile On or Off . When enabled, a call signal will remain active while the Talk button is active. This function is commonly used in applications where a two-way radio interface is connected. |
|
ISO Allowed |
Checking this box enables ISO on the corresponding button in the Profile. The selected Conference assignment must also have ISO enabled. From the Radio Pack, ISO is used by pressing and holding the corresponding Volume Knob. |
|
Min/Max Volume |
Displays and adjusts the minimum and maximum volume for the selected Profile |
Function Buttons
The Function Button panels allow the user to select and modify the settings for the two Function Buttons of all assigned Radio Packs.

|
Function Buttons |
|
|
Field/Function |
Description |
|
Function |
Select a Function assignment from the available options in the drop-down list.
|
|
Button Mode |
Either Momentary or Disable will be selected, depending on whether or not the Function Button has a Function selected. |
User Settings
Tip: When changing a setting while using High Density Mode, at least one return data path must be open (one of the four talk slots on a HiDen RT) for CrewWare to confirm that the change has been made on a Radio Pack. CrewWare displays a yellow indicator box around the changed setting and an exclamation point to the right of the setting to alert the user that the confirmation of change is pending. Once a talk slot is open, CrewWare will confirm that the setting has been changed on the Radio Pack and the indicator will go away.
User Settings are optional when assigning a profile. During profile assignment, users will have the option to accept the profile’s settings or keep the current user settings on that particular RP.
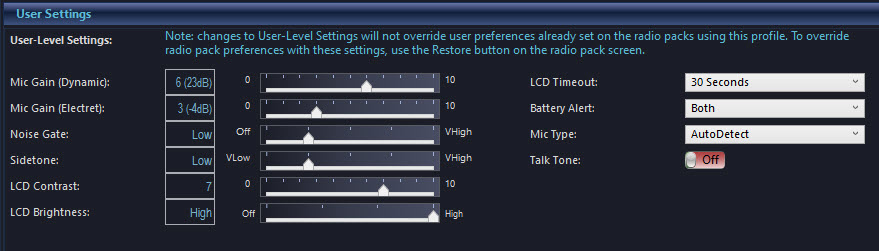
User Settings allow the user to set their preferences for the following functions:
|
User Settings |
|
|
Field/Function |
Description |
|
Dynamic and Electret Mic Gain |
When the Mic Gain is set too high, it is possible to induce feedback or echo. When set too low, words can be clipped by the low level noise gate, or may sound too quiet to other listeners. Different models of headsets will require widely varying mic gain settings. |
|
Noise Gate |
Set the minimum audio threshold necessary to allow audio to pass from the headset microphone to the rest of the system. Pliant recommends setting the noise gate as low as possible for best operation. |
|
Side Tone |
Speak into the headset microphone at a typical speaking level and adjust the sound of your own voice in the headset using this setting. |
|
LCD Contrast |
Increases or decreases the level of contrast in the RP LCD. |
|
LCD Brightness |
Sets the LCD backlight brightness level to High, Med, Low, or Off. |
|
LCD Timeout |
Sets the LCD backlight to power off 30 seconds, 10 seconds, or 3 seconds after engaging the RP interface. The user may disable the backlight time out by selecting Disabled. |
|
Battery Alert |
Select either Audible, Vibrate, Both, or Off as the type of alert the Radio Pack displays to notify user of low battery life level. |
|
Mic Type |
Select either Auto Detect, Dynamic, or Electret. Selecting Auto Detect is highly recommended. |
|
Talk Tone |
Enabling Talk Tones gives the user an audible tone when a talk button is pressed to communicate on a Conference. Talk Tone is not currently operational with ISO and Stage Announce. |
Assigning Radio Pack Profile
The Radio Pack LCD prompts the user to assign a Profile each time a Radio Pack is paired with a Control Unit. The list of available Profile assignments populates with either default Profiles (based on the Radio Pack model) or custom Profiles created by the user in CrewWare. There are several ways you can change an RP’s Profile assignment after this initial Profile selection at pairing. See the two CrewWare options detailed below.
Tip: Create new Profiles on the CrewWare Profile Management tab. (See Profile Management Tab for more information.) Select Upload Changes after editing or adding a Profile to push your changes to the affected (and powered) RPs.
Method 1: From CrewWare
- Open Detail View for the Radio Pack on the Device Management tab.
- Select a new assignment from the Assigned Profile drop-down menu.
- Confirm your change in the alerts that display to notify you of “live” system changes.
Important: To make changes to the assigned profile, CrewWare must be in a “Live” state.
Method 2: From CrewWare
- Open List View for the Radio Pack on the Device Management tab.
- On the selected RP’s row, find the Assigned Profile field (on the right), and select a new profile from the drop-down list.
- Confirm your change in the alerts that display to notify you of “live” system changes.
Important: To make changes to the assigned profile, CrewWare must be in a “Live” state.
You may also assign a profile from the Control Unit LCD and from the Radio Pack, if needed.