List View
The Device Management list view of Radio Packs displays a summary of each Radio Pack's settings.

Radio Pack List View
Clicking on the Summary button of this view simplifies the view into a summary of the Radio Packs' settings. To view more details, you'll need to view the individual Device View (outlined in the next section).
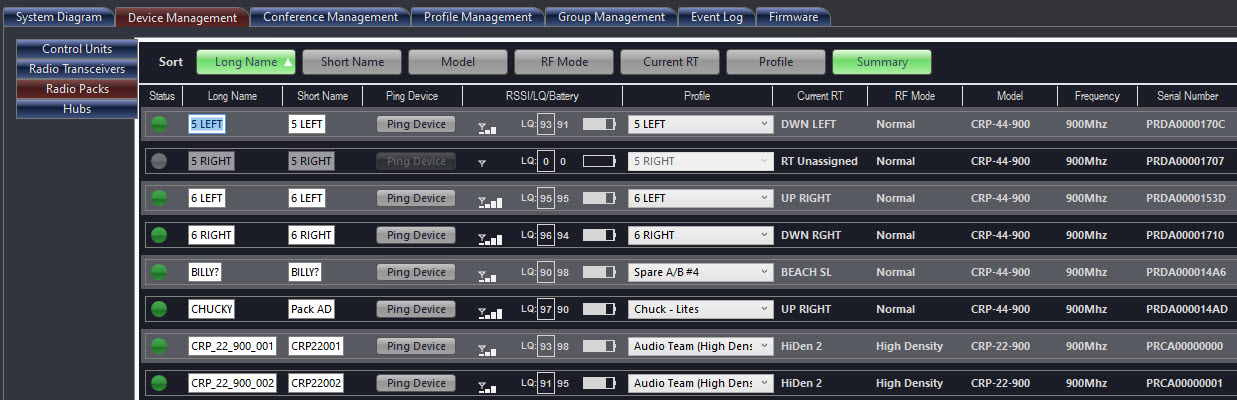
Radio Pack List View "Summary"
Device View
Double-click on a Radio Pack in the Device Management list view to access its device view and view/edit its settings. You must be in “live” mode to edit RP settings. In this view, clicking each sub-heading expands or collapses the panels containing more information and configurable settings. The top section of the detail view provides an overview of the selected Radio Pack, including buttons to interact with other CrewWare functions.

|
Radio Pack - Detail View |
|
|
Field/Function |
Description |
|
Long Name |
Type a name for the selected Radio Pack. There is a 16 character limit on the device name. |
|
Operational Status Indicator |
View-only status indication with the following possible statuses: OK (green), Low Battery (red), High Temperature (red), Logged Out (blue), or Inactive/Unknown (gray). |
|
Short Name |
Type an abbreviated version of the device name to display when needed. There is an 8 character limit on the device short name. |
|
Assigned Profile |
Select a Profile assignment for the RP from the drop-down list. If the assigned profile is changed while the system is live, you will be prompted to choose whether or not this change should overwrite user-level settings with the new profile’s defaults. |
|
List View Button |
Return to the Radio Pack list view. |
|
Edit Profile Button |
Go directly to the Profile Management settings for the RP’s assigned Profile. |
|
Restore Button |
Restore profile defaults for the selected RP. When restoring profile defaults, you will be prompted to choose whether or not to override and update the RP’s user-level settings as well as the profile settings. |
|
Mic Kill Button |
Send a mic kill signal to the selected RP. |
|
Ping Device Button |
Device location function where, when activated, will cause the backlight of the selected RP's LCD display (or LEDs in the case of the CRP-12) to blink until deactivated by the operator. Ping Device Button is also shown after Short Name in List View. |
|
Previous/Next |
Navigate through the device views for each individual Radio Pack from the list. |
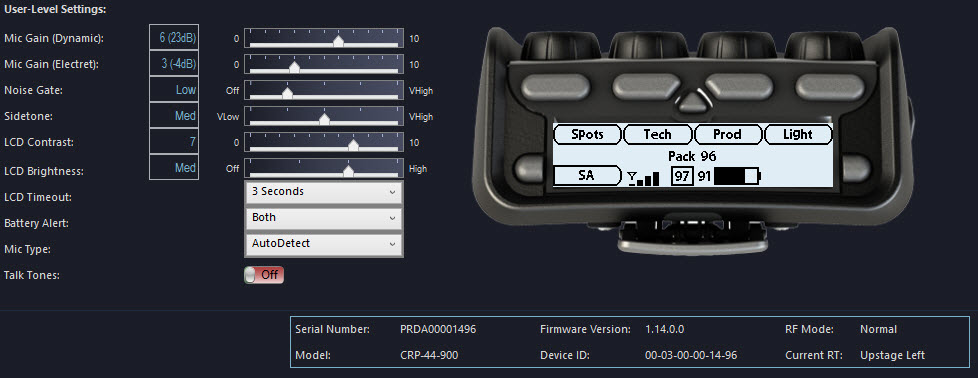
User Level Device Settings
Select the Radio Pack device settings and view a read-only list of device information (Mode, Firmware Version, Current RT, Model, Serial Number, and Device ID).This panel also includes a graphical representation of the real-time RP LCD. (When in “live” mode, you can click the RP’s triangle menu button and view the secondary screen, just like with a real RP.)
Tip: Changing user-level settings here does not make an identical change to the Profile. When user-level settings on the device do not match those on its assigned Profile, CrewWare displays a yellow circle indicator in this view beside that setting to alert the user that it differs from the RP’s profile. The user may restore the Profile’s default for that setting by clicking on the green indicator.
When changing a setting while using High Density Mode, at least one return data path must be open (one of the four talk slots on a HiDen RT) for CrewWare to confirm that the change has been made on a Radio Pack. CrewWare displays a yellow indicator box around the changed setting and an exclamation point to the right of the setting to alert the user that the confirmation of change is pending. Once a talk slot is open, CrewWare will confirm that the setting has been changed on the Radio Pack and the indicator will go away.
|
User-Level Device Settings |
|
|
Field/Function |
Description |
|
Mic Gain (Dynamic and Electret) |
When the Mic Gain is set too high, it is possible to induce feedback or echo. When set too low, words can be clipped by the low level noise gate, or may sound too quiet to other listeners. Different models of headsets will require widely varying mic gain settings. |
|
Noise Gate |
Set the minimum audio threshold necessary to allow audio to pass from the headset microphone to the rest of the system. Pliant recommends setting the noise gate as low as possible for best operation. |
|
Side Tone |
Speak into the headset microphone at a typical speaking level and adjust the sound of your own voice in the headset using this setting. |
|
LCD Contrast |
(CRP-22 & CRP44 only) Increases or decreases the level of contrast in the RP LCD. |
|
LCD Brightness |
(CRP-22 & CRP44 only) Sets the LCD backlight brightness level to High, Med, Low or Off. |
|
LED Brightness |
(CRP-12 only) Sets the LED brightness level to High, Med, Low or Off. |
|
LCD Timeout |
(CRP-22 & CRP44 only) Sets the LCD backlight to power off 30 seconds, 10 seconds, or 3 seconds after engaging the RP interface. The user may disable the backlight time out by selecting Disabled. |
|
Battery Alert |
Select the type of alert the Radio Pack displays to notify user of low battery life level. A battery alert will be sent when there are 30 minutes remaining on the battery. Options include the following: Audible, Vibrate,Both, or Off. |
|
Mic Type |
Select either Auto Detect, Dynamic, or Electret. Selecting Auto Detect is highly recommended. |
|
Talk Tone |
Enabling Talk Tones gives the user audible feedback when a talk button is pressed to communicate on a Conference. Talk Tone is not currently operational with ISO and Stage Announce. |
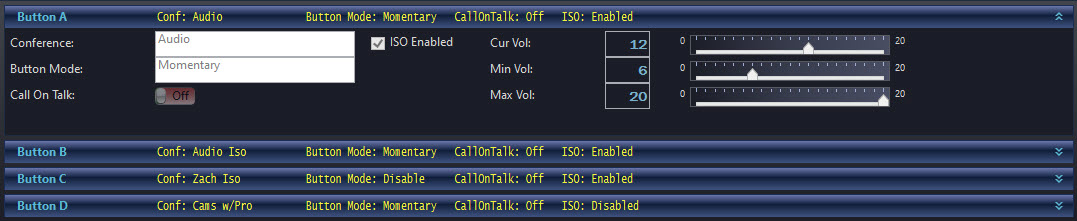
Talk/Volume/ISO Controls
Displays the RP talk button/volume knob/ISO button settings established by the Profile. Allows the user to modify the RP’s volume settings. Changing these settings will NOT make an identical change to the Profile.
|
Device Talk/Volume/ISO Controls |
|
|
Field/Function |
Description |
|
Call on Talk |
When on, a call signal is sent when the Talk Button is pressed and is turned off when it is released. To toggle this setting, edit the Profile on the Profile Management tab. |
|
ISO Allowed |
Reflects whether or not a user can access the assigned conference’s ISO function. To enable this setting, enable ISO for the conference on the Conference Management Tab, and then toggle on ISO via the Profile on the Profile Management tab. |
|
Current Volume |
Displays and adjusts the current volume for the selected RP |
|
Min/Max Volume |
Displays and adjusts the minimum and maximum volume for the selected conference volume knob. |
Function Button Panels
Displays the function button settings established by the Profile.
