List View
The Devices list view of Control Units displays a summary of each Control Unit's settings.
Control Unit List View
Clicking on the drop-down arrow of this view expands the view of each Control Unit's settings. To view more details, you'll need to view the individual Device View (outlined in the next section).

Control Unit Expanded List View
Device View
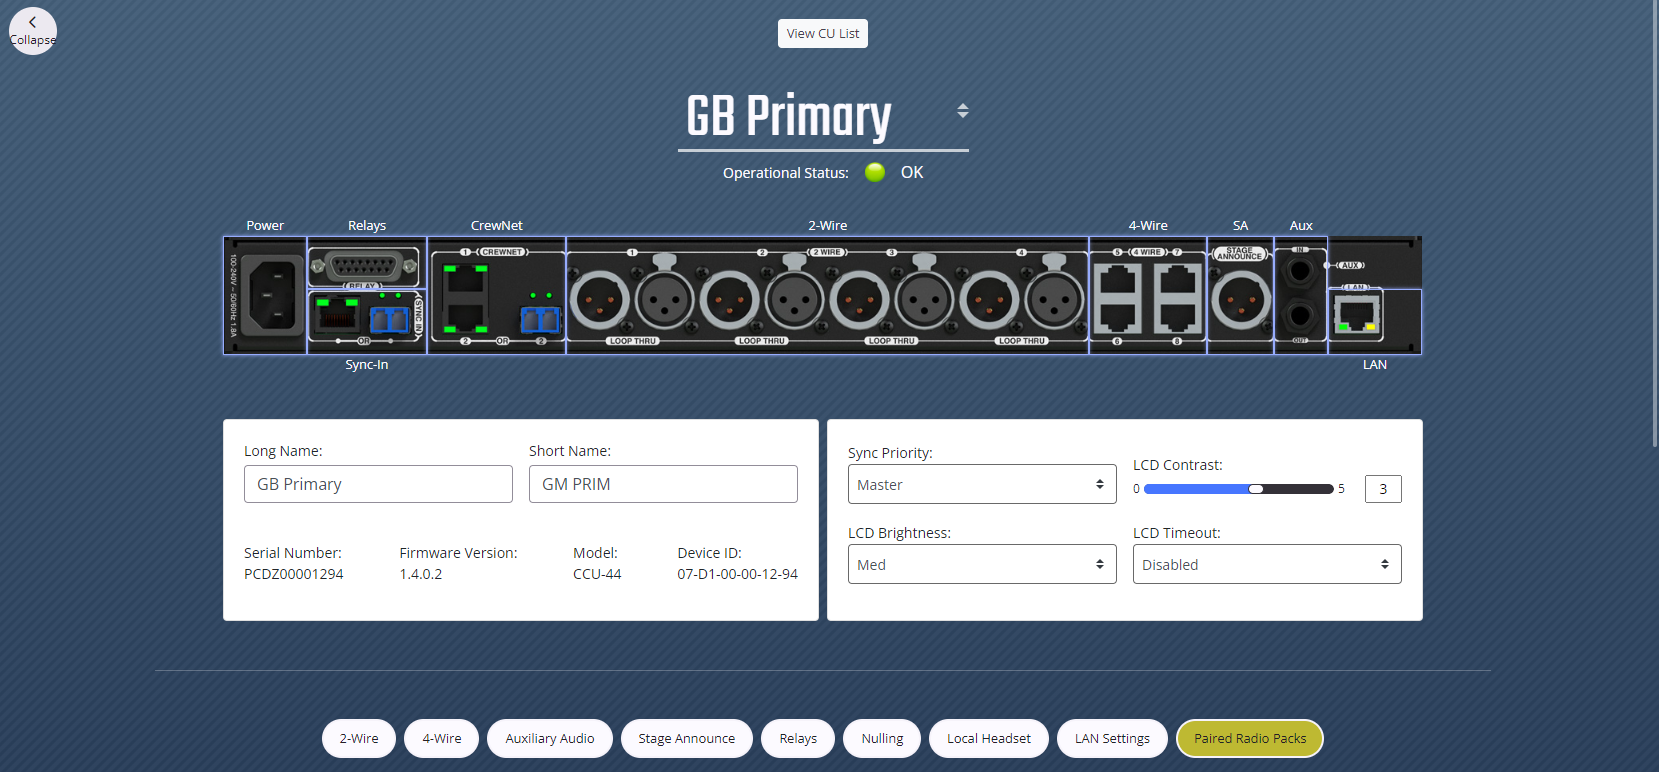
Double-click on a Control Unit in the Device Management list view to access its device view and view/edit its settings. In this view, clicking each sub-heading expands or collapses the panels containing more information and configurable settings. The top section of the Control Unit detail view provides an overview of the selected Control Unit.
|
Control Unit - Detail View |
|
|
Field/Function |
Description |
|
List View Button |
Return to the Control Unit list view. |
|
Device Drop-Down List |
Choose a device from the drop-down menu to see the detail view. |
|
Operational Status Indicator |
View-only status indication with the following possible statuses: OK (green) and Missing (red). |
|
Long Name |
Type a name for the selected Control Unit. There is a 16 character limit on the device name. |
|
Short Name |
Type an abbreviated version of the device name to display when needed. There is an 8 character limit on the device short name. |
|
Device information (Mac Address, Serial Number, Firmware Version, Model, and Device ID) |
Read-only list. |
|
Expand/Collapse All Button |
Opens all collapsed settings panels for the selected device. When clicked again, returns to collapsed panels. |
|
Auto Null Button |
Nulls Control Unit 2-wire ports. Nulling only impacts 2-wire hard wired intercom connections. Activate Auto Null for new connections or whenever the 2-wire system changes, such as when additional non-CrewCom wired belt packs are added or removed, or when cable lengths are changed. |
|
Ping Device Button |
Function is not currently available. |
|
Previous/Next Buttons |
Navigate through the device views for each individual Control Unit from the list. |
|
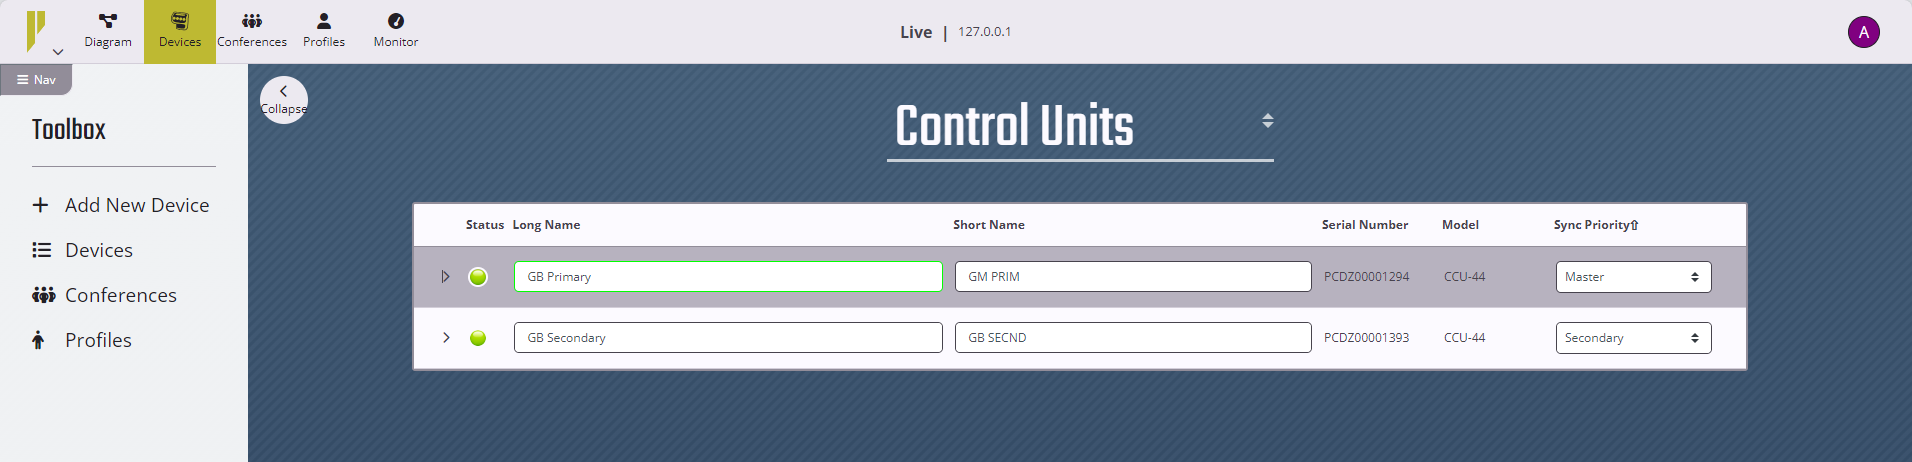
Sync Priority |
Set a label for the relationship between Control Units working together on a system. Available options are Master, Secondary, and Tertiary. By default, the first Control Unit added to the CCF is automatically assigned the Master sync priority. Every CCF must contain one primary Control Unit, which is set either through the CU menu or CrewWare. Secondary and Tertiary sync priority assignments are not currently operational. |
|
LCD Contrast |
Increase or decrease the level of contrast in the CU’s LCD. |
|
LCD Brightness |
Set the LCD backlight brightness level to High, Med, Low, or Off. |
|
LCD Timeout |
Set the LCD backlight to power off 60 seconds, 30 seconds, or 10 seconds after engaging the CU interface. The user may disable the timeout by selecting Disabled. |
|
Front Panel Lock Check Box |
The buttons and knobs on the front of the Control Unit will not function when locked—except for the power switch (which will power the unit off) and the Volume knob and Talk button (which will allow communication with a connected local headset.) |
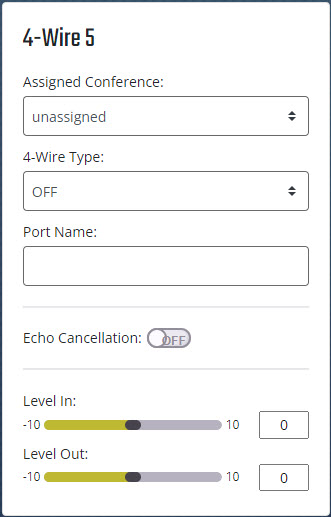
The number of available 2- and 4-wire port setting panels will vary depending on your Control Unit model. The CCU-44 has four 2-wire ports and four 4-wire ports, the CCU-22 has two of each, and the CCU-08 has eight 4-wire ports. The settings shown below are repeated for each port in CrewWare.
|
Control Unit Intercom Settings |
|||
|
Field/Function |
Description |
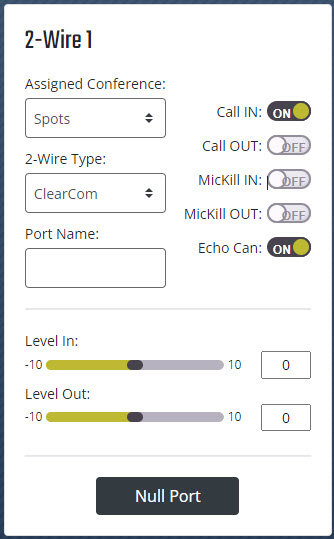
2Wire |
4Wire |
|
Assigned Conference |
Set the individual port’s Conference assignment, to which wireless users or the CU’s local headset port are able to communicate with external intercom systems routed through this port. |
X |
X |
|
Type |
For 2-wire ports, select intercom system type (RTS Ch1, RTS Ch2, AudioCom, and Clear-Com,). For 4-wire ports, enable the port (On/Off). |
X |
X |
|
Audio Mode |
Set the audio mode in this field. Duplex is the standard, default operating method for a 2- or 4-wire audio port. The input side will feed the assigned Conference audio content while the output side gets the audio from all other input entities on that conference, minus its own input (mix minus). |
X |
X |
|
Port Name |
Set a name for the port. Limited to 16 characters. |
X |
X |
|
Level In |
The IN level control adjusts the incoming level (from the connected wired intercom) of the currently selected wired intercom channel. If an intercom port is disabled, changes to the IN Level do not affect any audio. |
X |
X |
|
Level Out |
The OUT level control adjusts the outgoing level (from CrewCom) of the currently selected wired intercom channel. If an intercom port is disabled, changes to the OUT Level do not affect any audio. |
X |
X |
|
Echo Cancellation (ECAN) |
The default setting for ECAN is on for 2-wire ports and off for 4-wire ports. ECAN may be turned off if desired; however, Pliant recommends leaving ECAN on for all 2-wire ports at all times. When toggled off, this button is red. When a device null is in progress to optimize 2-wire ports, ECAN is disabled. |
X |
X |
|
Inbound/Outbound Call Enabled |
Each wired intercom port (2-wire only) can be individually set to send and receive a CrewCom-generated call signal to/from a connected wired intercom system. To do so, turn that port’s Call function ON. Turning the Call function OFF only prevents the signal from entering or leaving CrewCom via the respective port. Call signals can still be generated and transmitted by entities across CrewNet. The default setting for Call is OFF. |
X |
|
|
Mic Kill Enabled |
Toggle the port’s Mic Kill function. This function is not currently available. |
X |
|
|
Null Port |
The user can null all individual ports on a selected device by using this button on each port panel, or by clicking the AutoNull button at the top of the tab. Running this command will temporarily disrupt communications for the affected 2-wire ports. |
X |
|
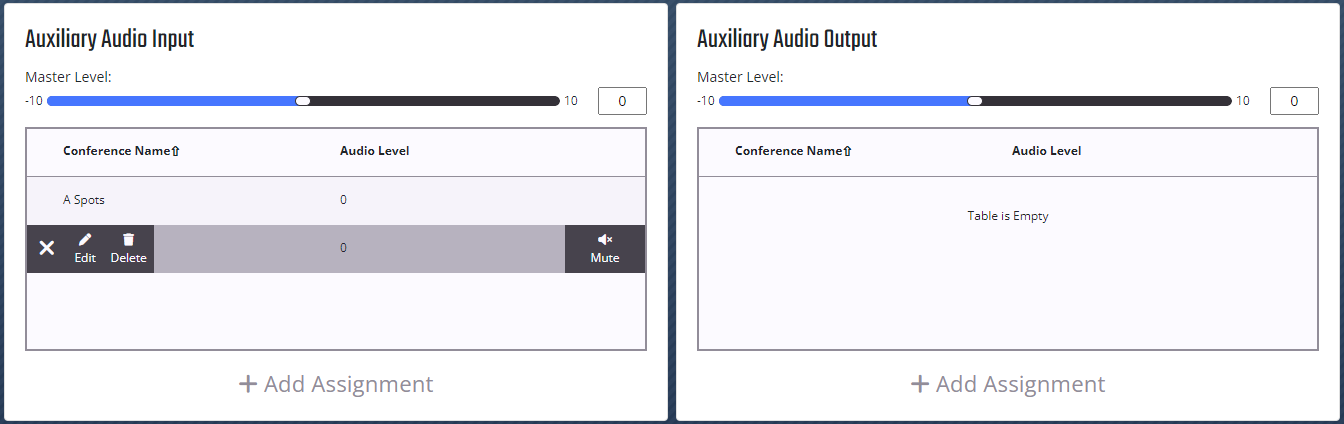
To add an assignment to the auxiliary audio input or output, click the Add Assignment button below each box on the panel. To delete an assignment, click the assignment row you want to delete, and use the menu to the left to select Delete. Audio supplied to Aux IN can be assigned to any combination of up to 10 possible Aux Conferences. Audio supplied from Aux OUT can be assigned from any single Conference. Individual level adjustment for each Auxiliary Audio assignment is not currently operational; rather, the Aux In or Aux Out Master Level settings will determine the levels for all assignments below them. When checked, the Lock Sliders checkbox on this panel preserves the proportions of the current audio level sliders if one is moved. (Unchecking the Lock Sliders checkbox is not currently available.) The user can also mute the assignment levels from this panel.
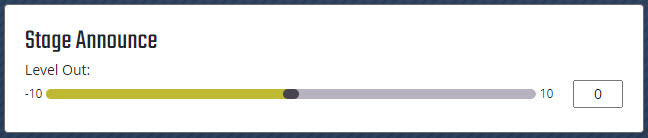
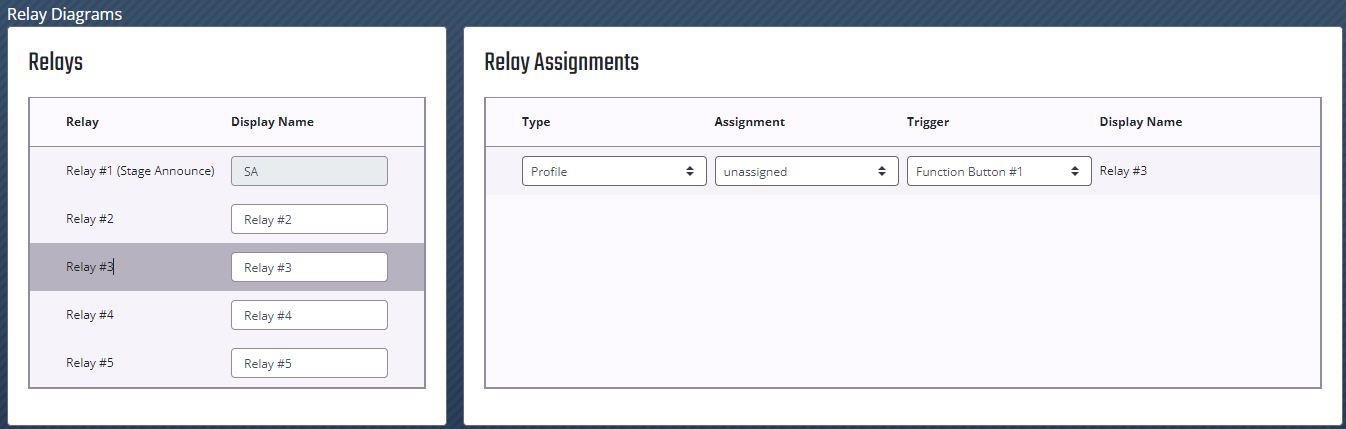
Adds or deletes relay assignments and configures each relay assignment, trigger, and Profile. Relay #1 is reserved for the Stage Announce Relay. In addition to this one, CrewCom includes four additional General Purpose Output (GPO) contact closures for interfacing with other external devices. Up to 160 relay assignments can be created. The user has access to both the normally open and the normally closed contacts for each relay, and user Profile and trigger can be set from this window. Rated load for all relay contacts: 0.3 Amp at 125VAC, 1 Amp at 30VDC.
The Nulling panel displays a table of the selected Control Unit’s 2-wire ports, and when nulling is initiated, the table will display the progress of the process. You can initiate null for a single port or for all ports.
Activate Auto Null for new connections or whenever the 2-wire system changes, such as when additional non-CrewCom wired packs are added or removed, or when cable lengths are changed.

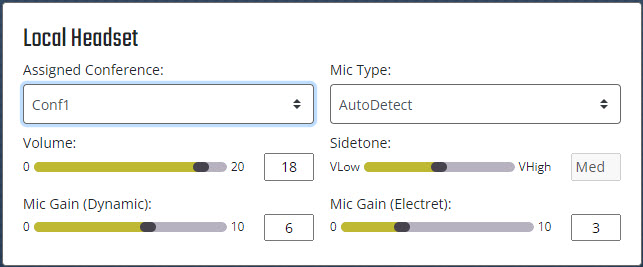
The user may modify the settings below to control a local headset connected to the Control Unit.
|
Control Unit - Headset Panel |
|
|
Field/Function |
Description |
|
Assigned Conference |
Set the Conference to which the local headset is listening. |
|
Mic Type |
Select either Auto Detect, Dynamic, or Electret. Selecting Auto Detect is highly recommended. |
|
Volume |
Set the volume of the headset audio. |
|
Sidetone |
Speak into the headset microphone at a typical speaking level and adjust the sound of your own voice in the headset using this setting. |
|
Dynamic and Electret Mic Gain |
When the Mic Gain is set too high, it is possible to induce feedback or echo. When set too low, words can be clipped by the low level noise gate, or may sound too quiet to other listeners. Different models of headsets will require widely varying mic gain settings. |
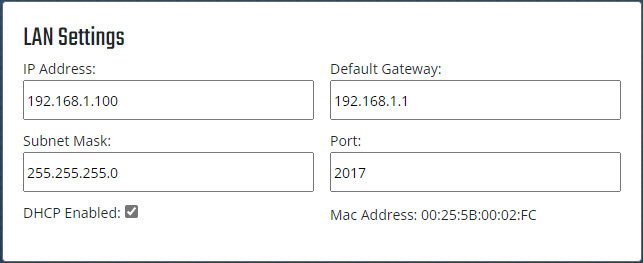
Settings in this box determine the IP Address, Default Gateway, Subnet Mask, Port and DHCP status for CrewCom LAN configuration between your Control Unit and PC operating CrewWare. You may only make changes to these settings while CrewWare is offline, and you will need to save your CCF and re-upload it to the primary CU for the changes to take effect.
Note: The default Port value to connect to a Control Unit is 2017. You may change this default using CrewWare if your firewall settings require it.