The CB2 BaseStation operates in conjunction with the CRP-12 Radio Pack and the CRP-C12 Compact Radio Pack and can be used in highly-varying applications and environments.
CRP-12 Top
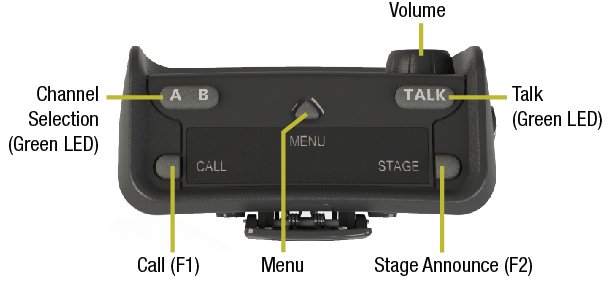
CRP-12 Top View
Volume Knob
The volume control adjusts the listening volume of the connected headset. Turning the volume control clockwise increases the audio level, while turning the control counter-clockwise decreases the level.
Talk Button
The Talk button enables or disables the microphone for the selected channel. In the CB2 BaseStation’s menu, Talk buttons can be disabled or set to function with a “Latch” or a “Momentary” press. The Latch option is not available in High Density Mode.
In addition, CrewCom uses an intelligent latching method for Talk buttons. When set to “Latch,” one short press will latch the talk on; however, pressing and holding the Talk button will cause the button to act as a momentary switch.
Channel Selection Button
The Channel Selection button switches between Channel A and B for the Radio Pack. The LED for the selected channel will be illuminated. Radio Packs can be set up to access both Channels A and B (but only one at a time), only Channel A, or only Channel B.
Call and Stage Announce Buttons (F1/F2)
Each Radio Pack has two function buttons. The left (F1) function button serves as Call when enabled from the CB2 BaseStation’s menu. The right (F2) function button serves as Stage Announce when enabled from the CB2 BaseStation’s menu.
Menu Button
The Menu button provides access to menu options.
- Press and hold the Radio Pack Menu button AND press and hold the CB2 BaseStation’s Menu button. When both Menu buttons are depressed for three seconds, the menu mode is enabled.
- Change the RP’s channel setting by pressing and holding the Menu button AND (while holding) press the Channel button to cycle through setting options A or B, A only, or B only. The Channel button LEDs will illuminate to indicate the active option. Once the desired option is displayed, release the Menu button to select it. When A or B is selected, the RP user must use the Channel Selection button on his or her RP to switch between the channels. The LED for the selected channel will be illuminated.
CRP-12 Rear
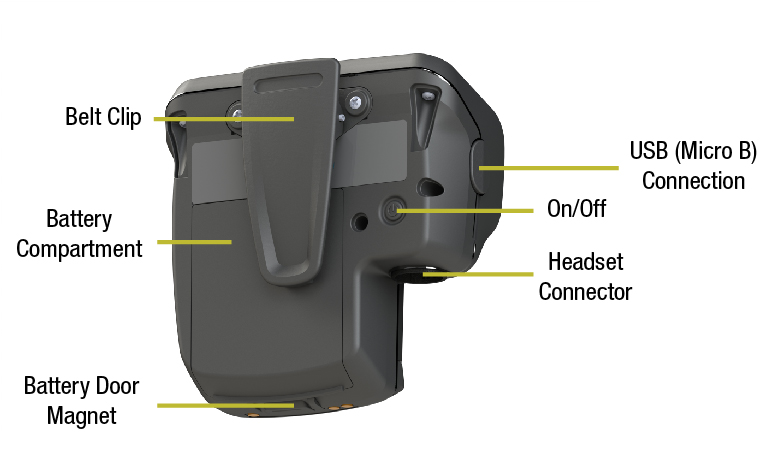
Belt Clip
Secure and sturdy belt clip enables Radio Pack wearing via belt or lanyard.
Battery Compartment Door
Secures and protects the Radio Pack’s Lithium-Polymer battery or 3 AA batteries. Lift the battery door to release and detach it from the Radio Pack.
Battery Door Magnetic Latch
Secures the Radio Pack's battery compartment door.
USB (Micro B) Connection
This USB connection is for connecting a Radio Pack to a CB2 BaseStation for pairing. The Radio Pack may also be connected to a PC for firmware updates via the Firmware Updater Application. See Update Firmware.
On/Off Button
The On/Off button powers the Radio Pack on and off when pressed for 3 seconds.
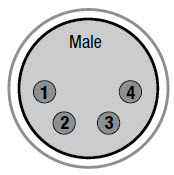
4-Pin Male XLR Headset Connector
Headset connector is a 4-PIN male XLR connection. A compatible headset must be provided by the user. See the SmartBoom PRO and SmartBoom LITE data sheets on Pliant's Headsets Documentation Page for the pin wiring information for Pliant's SmartBoom headsets.
|
Headset Connection Wiring |
|
|
XLR Pin # |
Description |
|
Pin 1 |
Mic − |
|
Pin 2 |
Mic + |
|
Pin 3 |
Speaker − |
|
Pin 4 |
Speaker + |
- CrewCom Radio Pack
- Lithium-Polymer Rechargeable Battery
- Multi Blade Worldwide Battery Charger/Power Supply
- USB-A to Micro B Cable
- Radio Pack Product Overview Guide
Additional Items Required
In addition to your Radio Pack, a compatible headset is required to complete your CrewCom System (sold separately).