The following settings can be accessed by pressing the Local button on the front panel of the BaseStation or by pressing Menu and navigating to Local Headset Settings.
Selecting the Local Headset Channel
The BaseStation headset connector is a functional user communication point. The Front Panel Headset allows you to communicate on either Channel A or B. Change the active channel by pressing in on the Local Headset volume knob.
Changing the Local Headset Mic Gain
For dynamic microphones, select from within a range of +6 to +35 dB. For electret microphones, select from within a range of -12 to +17 dB. When the Mic Gain is set too high, it is possible to induce clipping, feedback, or echo. When set too low, words may sound too quiet to other listeners. Headsets by different manufacturers or different models of headsets will require widely varying Mic Gain settings.
The default setting for dynamic local mic gain is "6" (+23 dB). The default setting for electret local mic gain is "3" (–4 dB).
Selecting the Local Headset Mic Type
Select from Auto-detect, Dynamic, or Electret mic type. If you select a mic type that does not match the detected type of the connected mic, you will be prompted to accept the exception. It is highly recommended that the default Auto-detect is used.
Adjusting the Local Headset Sidetone
Sidetone value is expressed in dB. When adjusting sidetone, you will see a level indicator with a numeric value between 0 dB and -24 dB. The default setting for local headset sidetone is "Med" (-12 dB). Speak into the headset microphone at a typical speaking level and adjust the sound of your own voice in your headset. Press Enter to accept the changes.
Using the Local Headset
Talk and Volume Controls for the headset are located to the right of the connector.
A white “TALK” LED will illuminate when the mic is enabled. CrewCom uses an intelligent latching method for Talk buttons. Quickly pressing and releasing Talk will cause the mic button to latch. The white “TALK” LED will stay lit and the microphone will remain enabled. Pressing and holding Talk will cause the button to act in a momentary fashion. The white “TALK” LED will remain lit and the microphone will remain enabled only as long as the button is pressed.
Local Headset Pinout and Wiring
|
Local Headset Connection Wiring |
|
|
XLR Pin # |
Description |
|
Pin 1 |
Mic − |
|
Pin 2 |
Mic + |
|
Pin 3 |
Speaker − |
|
Pin 4 |
Speaker + |
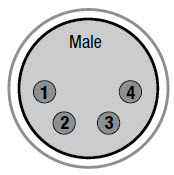
4-Pin XLR Male Local Headset Connection
See the SmartBoom PRO and SmartBoom LITE data sheets on Pliant's Headsets Documentation Page for the pin wiring information for Pliant's SmartBoom headsets.